
 |
| Image for *KIT* Grab Button |
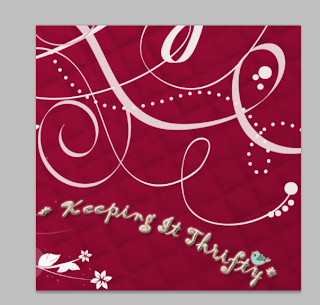
I have a number of bloggie friends out there that still don't have a grab button for their page, and recently I was able to create one for my bloggie friend, Andrea, for her site *Keeping It Thrifty*, we thought it'd be a good way to create a tutorial for those bloggers out there who haven't had one yet, or for those who would like to create there own.
To create a button you will first need the tools to make this happen such as Adobe Photoshop, or Microsoft Paint or some kind of software like it. I used Adobe Photoshop CS4 to create this one, and Photoshop CS to create My bloggie friend Amber's button for her site Journey of Grace as well as my own button. Now if you don't have any of these programs you can find places online that will let you download free software that will work. At Toggle you can download Photoshop CS2 for free (I have never downloaded from Toggle before, so I don't know if there are any catches, or anything, so make sure the site is safe before downloading anything.) You can also download trail versions from Adobe, which I would recommend first because its a safe site. However they are only trials, so you only get to use it for a number of days. You also need to make sure that the computer you are using has all the specs it needs for the download. You will also need a host site for your image like Photobucket. You can set up a free account with photobucket, which you will later upload your image to.
Anyhow, once you have your software it's time to start creating. I'll take you through this with Photoshop CS4 (however, you can also do most of this with other Photoshop software.)
Change Pixel Size for W to 125, and for H 125 and the Resolution to 72 ( You don't need anything bigger then this because you are creating a thumbnail image. Also, once it is saved to these dimensions if you'd try to make it bigger it'll probably look very pixelated.) If you'd like to work in a larger area set your pixel size to W500 and H500 then when it is complete change the image size by going to >Image >Image Size and change the pixel dimensions to W125 and H125.

2. Now you should have a nice little box, this is where you get creative and design your image.

3. pick your background color and fill it.

4. I wanted to make my image look quilted to do this I found an picture of a white quilt sample, and saved it to a file on my computer. Then to placed it on to my image. >Click File, >Click Place

5. Next you will go to the Layers Menu on the bottom right of the screen. Next to the word Normal >click the black down arrow, and a menu will pop up. Scroll up and >Click Multiply
 |
| before Multiply |
 |
| after Multiply |
 |
| With Swirly Brushes |
 |
| Here I added the title using the Text tool and the Rotated the image. |
Then resave by click >File >Save As and save it as a JPG file.

*On a side note: you can create a simple blog button with Microsoft Paint here is an image I created by grabbing a free image as a background, resizing the pixels to W125 and H125, and then putting text of the title page over it. Save As a jpg image.
 |
| simple blogger button created with MS Paint |
8. Now you are ready to upload your image to a host site. (I use Photobucket). Open the image hosting site. Click on the Green Upload Image bar.

9. After the image is uploaded you can copy the Direct Link Code to place with in the HTML Code posted below.
10. Ok Now we're going to use the code posted below and adjust it to work with your blog. (A while back I found this code online, but unfortunately don't remember which site, and there are many of them that do have code like this, anyhow...) Type this code into a word document or text file, and save it for later use.

Make these adjustments to the code above:
1.Place your blog URL in place of the red lettering
2.Place the title of your blog in place of the blue lettering
3.Place the direct link code in place of the green lettering.
11. Now open your blogger dashboard and click >Design
12.click >Add Gadget
13. click > HTML/ Java Script box
14. Copy and Paste your new code into the text box.
15. Copy and Paste the following code into the Title Box:
Grab My Button
16. Click >Save, and view your blog.
17. You're Done. Congratulations you've created your very own blog "Grab Button"!
On your page it should look something like the one posted below.

Great tutorial!!! thanks for posting! great job!
ReplyDeletehello!
ReplyDeleteI followed the tutorial and It was so helpful!!
I have one problem when you copy and paste the code it does not show up! Do you know how to fix it??
Thanks
Carmen,
ReplyDeleteI emailed you about this. Could you try the new code I sent you, and let me know if it works?
Thanks,
Tana