Friday, October 29, 2010

Scentsy Candles Giveaway!

This Giveaway has Ended


I love candles; Party lites candles, and Yankee candles being at my top of my list for favorite smelling candles because when you light one candle it will make your whole house smell of goodness. I've recently found a new kind of candle that I love Scentsy wickless candles. I first came across them at a neighbor’s rummage sale, where a niece of my neighbor was selling the product. I stood there for about an hour sniffing the different fragrances, and thinking how great these would be. First because my oldest son love to put his fingers in to the hot wax of the candles that I have lit whenever mom isn't around to give him a lecture of how he could get burnt, and although he could still do this with the wickless candles at least there wasn't an actual fire there to burn him. Second my middle son who had a fire safety class at school blows out every candle I have lit saying, "You know mom, you should never leave a fire unattended. Your house could burn down, and then what'd you do?" I reply, "Yes, Giovonnie, but they make the house smell so nice." With these candles, my middle son would no longer blow out my candle, and I could still have a great smelling house.


Plus, the warmers come in different a variety of sizes, large, medium, or as a plug-in size warmer, which also come in a variety of different themes as well, which make it easy for the warmers to match your home decor. (As you can see from some of the photos that I posted that some of these warmers are male friendly and would look great in an office, or even a boy's room.)


Anyhow, I love this product and have found a super awesome Independent Scentsy Consultant, Angelie Shrader, who is willing to allow me to host a giveaway on my site just in time for the holidays that are soon approaching. Angelie has offered to giveaway one full size warmer along with a Scentsy Bar!

The Rules of the Giveaway
(giveaway ends Nov. 12, 2010)
Mandatory:
Visit Angelie Shrader's independent Scentsy consultant website check out all of the warmers and scent bars. Then come back here to leave a comment and tell us which warmer and scent you’d love to have in your home. Make sure you leave an email address or a way to  contact you if you win.

Extra Entries: (Post one comment for each) 
1. Become a public follower of my blog on GFC; if you're already a follower leave a comment stating that you are. ( + 1 entry)
2. Visit Angelie on her facebook page leave a comment there that you have entered the giveaway at LittleBirdSeeds blog. ( + 1 entry)
3. Post about this giveaway on your blog site, and link back to my giveaway page. ( + 2 entry)
4. Subscribe to my email updates. ( + 1 entry)
5. Share about this blog giveaway on your Facebook page. ( + 1 entry per day)


Thursday, October 28, 2010

The Winner For the Book GiveAway: After the Leaves Fall is....

Congratulations Jessica. 
Would you please send my your shipping info via email, so that I can ship the book out to you asap.

Thursday, October 14, 2010

How to Create You Very Own "Grab Button"


Image for *KIT* Grab Button


I have a number of bloggie friends out there that still don't have a grab button for their page, and recently I was able to create one for my bloggie friend, Andrea, for her site *Keeping It Thrifty*, we thought it'd be a good way to create  a tutorial for those bloggers out there who haven't had one yet, or for those who would like to create there own.
To create a button you will first need the tools to make this happen such as Adobe Photoshop, or Microsoft Paint or some kind of software like it. I used Adobe Photoshop CS4 to create this one, and Photoshop CS to create My bloggie friend Amber's button for her site Journey of Grace as well as my own button. Now if you don't have any of these programs you can find places online that will let you download free software that will work. At Toggle you can download Photoshop CS2 for free (I have never downloaded from Toggle before, so I don't know if there are any catches, or anything, so make sure the site is safe before downloading anything.) You can also download trail versions from Adobe, which I would recommend first because its a safe site. However they are only trials, so you only get to use it for a number of days. You also need to make sure that the computer you are using has all the specs it needs for the download. You will also need a host site for your image like Photobucket. You can set up a free account with photobucket, which you will later upload your image to.
Anyhow, once you have your software it's time to start creating. I'll take you through this with Photoshop CS4 (however, you can also do most of this with other Photoshop software.)

1. > Click File, >Click New
Change Pixel Size for W to 125, and for H 125 and the Resolution to 72 ( You don't need anything bigger then this because you are creating a thumbnail image. Also, once it is saved to these dimensions if you'd try to make it bigger it'll probably look very pixelated.)  If you'd like to work in a larger area set your pixel size to W500 and H500 then when it is complete change the image size by going to >Image >Image Size and change the pixel dimensions to W125 and H125.

2. Now you should have a nice little box, this is where you get creative and design your image.

 
3. pick your background color and fill it.


4. I wanted to make my image look quilted to do this I found an picture of  a white quilt sample, and saved it to a file on my computer. Then to placed it on to my image. >Click File, >Click Place
when it's the right size and in the right place >click the green check mark above in the tool bar.
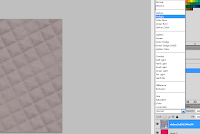
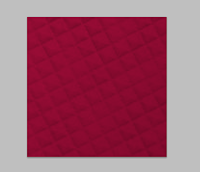
5. Next you will go to the Layers Menu on the bottom right of the screen. Next to the word Normal >click the black down arrow, and a menu will pop up. Scroll up and >Click Multiply
before Multiply
after Multiply
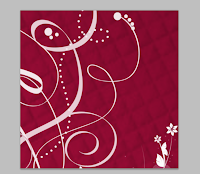
6. I chose to decorate this one with cute Swirly Brushes that I found online for free because I wasn't using them for commercial use I didn't have to buy licensing.


With Swirly Brushes
 
Here I added the title using the Text tool and the Rotated the image.
7. Once you've finished designing your button, Click > File, >Save As. Save your file fist as a PSD, PDD file, so that you can make changes to the image later if you wish.
Then resave by click >File >Save As and save it as a JPG file.


*On a side note: you can create a simple blog button with Microsoft Paint here is an image I created by grabbing a free image as a background, resizing the pixels to W125 and H125, and then putting text of the title page over it. Save As a jpg image.

simple blogger button created with MS Paint


8. Now you are ready to upload your image to a host site. (I use Photobucket).  Open the image hosting site. Click on the Green Upload Image bar.


9. After the image is uploaded you can copy the Direct Link Code to place with in the HTML Code posted below.

10. Ok Now we're going to use the code posted below and adjust it to work with your blog. (A while back I found this code online, but unfortunately don't remember which site, and there are many of them that do have code like this, anyhow...) Type this code into a word document or text file, and save it for later use.

Make these adjustments to the code above:
1.Place your blog URL in place of the red lettering
2.Place the title of your blog in place of the blue lettering
3.Place the direct link code in place of the green lettering.

11. Now open your blogger dashboard and click >Design
12.click >Add Gadget
13. click > HTML/ Java Script box
14. Copy and Paste your new code into the text box.
15. Copy and Paste the following code into the Title Box:
Grab My Button
16. Click >Save, and view your blog.
17. You're Done. Congratulations you've created your very own blog "Grab Button"!
 On your page it should look something like the one posted below.


Wednesday, October 6, 2010

My First Book Review and Giveaway.

After the Leaves Fall by Nicole Baart

After the Leaves Fall is a Christian fiction book by Nicole Baart, an author who happens to live near the town in which I live. I attended a bible study group that she lead once, not knowing at the time that she was an author until my sister-in-law pointed it out and loaned me a book by her, called The Moment Between. Not expecting to enjoy a "Christian" based book, as I figure most pour on the Get Saved and Why you Need God (or why the characters need God), which tend to come off as cheesy to me. Anyhow, I read The Moment Between and found it unexpectedly good and not at all the cheesy Christian book that I expected; this book made me laugh, cry, and wonder what's going to happen next. Anyhow, a few weeks ago I came across another book by Nicole Baart, After the Leaves Fall, so I purchased it. I think this book was even better then the last that I've read or her books, and defiantly one I would suggest and pass along to friends and family.


Nicole does well to relate family dynamics, friendships, and even the characters relationships with God to real life experiences. The story takes place in Northwest Iowa, which I couldn't believe how closely she described it, and wondered how many people from this area she may have offended and how many of them found it as comical as I did.

The main charter of the book, Julia DeSmit, is a teen-age girl who's felt the abandonment of a parent, the loss of another and the struggles of young love. Like most teenagers bounding out to college dream of leaving the small town that they grew up in for bigger and better lives, Julia does too, only to find things don't always go as planned. After many blunders, Julia returns home feeling defeated and more uncertain than ever before. Feeling as if she’s hit bottom Julia cries into the floor of her living room, and when her Grandma finds her she lays next to Julia, and within the conversations gives Julia hope by simply saying, “You turn around. You look up."

This book is bound to make you tear up a little, laugh a bit, and think about your own life and the relationships that you hold. Although its fiction, it's so well written you'd think that the characters were real, and the story was true. I can't wait to read the next book Summer Snow.

Like I said earlier in this post, this is a book that I would suggest and pass along to friends or family, so if you are interested why not get it free! I'm offering my book to one of you lucky readers out there. So from now until Oct. 27th you may enter the giveaway by becoming a public follower with GFC (post to let me know you are a follower) and with that post leave me a comment letting me know your favorite book genre. Please also post an email address so that I may contact the winner. The winner will be chosen by random.

*Disclaimer: This book was not giving to me, and Nicole Baart nor anyone affiliated with the book asked me to write a review on this book, After the Leaves Fall.
This Giveaway Has Ended.

Tuesday, October 5, 2010

Riddles

Q:What do you get when you cross Swagbucks + $5.00 Amazon Gift Cards?


A:Christmas Gifts for FREE!


I've become a Swag buck person only collecting from searches (which I do a lot of for my online classes and writing the many many papers) and hit and miss daily polls, and it has seemed to pay off. After receiving 450 swag bucks I ordered an Amazon gift card, as I already have an Amazon account because of my love for cheap books. After a short time, I received my gift card code, and hopped over to Amazon to see what I could find. I searched the toys and adjusted it to read from lowest price to highest priced items, and was surely surprised when things came up at $0.01. I took some time looking through the many items/ gaming cards and I came across a New Melissa and Doug Smoulder the Dragon Puppet. Once I clicked on it and found that shipping was only $4.99, I knew I could not pass up a great deal. Anyone who knows anything about Melissa and Doug toys knows that they are good quality educational toys that are not cheap. I snagged up that Dragon with my gift card I earned off of Swag bucks, and here is what my order receipt showed!(the red words below, which I copied from my actual receipt from Amazon)


Items Ordered Price


1 of: Melissa & Doug Smoulder the Dragon Puppet [Toy]


Condition: New


Sold by: tamikawat (seller profile)


$0.01


--------------------------------------------------------------------------------


Item(s) Subtotal: $0.01


Shipping & Handling: $4.99


-----


Total Before Tax: $5.00


Sales Tax: $0.00


Gift Certificate/Card Amount: $5.00


-----


Total for This Shipment: $0.00


Total paid by Gift Certificate/Card: $5.00


-----


Did you see that amount for Total for This Shipment of $0.00! Well, I received that package in the mail today, and here is what it looks like still in its plastic packaging (He is a gift for one of my children, so please don't say anything to them. Thanks).  Isn't he cute!


Anyhow, my point being is that this is such a great deal for a little bit of time and searching without the hassle of being spammed about it, so if you’re not a Swagger yet click on the Swagbucks link at the side of my page and go sign up; You never know you just may find a great deal like I did. 

Friday, October 1, 2010

Feeling Crafty - Multimedia Children's Wall Art


Here is the almost done stage,
only the fabric and sharpie pen out line.
 
 From the moment finished the bookmarks I made the other day I've had the crafting bug. I spied some children's wall art at Pinkapotamus' Etsy Shop that gave me just the right motivation to create a piece of my own art work, which I wanted to create in fabric. I grabbed the 12x16 pre-primed canvas that I had stored next to my art table, and my Mod Podge, and got some more fabric scarps from the box in my basement. Then set to work in the living room on my coffee table, so that I could be where Gannon was playing and keep and eye on him, instead of at my art table like I should have been. Anyhow after copying and cutting out a pattern for a quilt out of a book I picked up at a garage sale, called In the Nursery by J. Sampou & C. Schmitz, I traced and then cut out my fabric pieces, assembled them and Mod Podged them into place. After the Mod Podge dried I took a sharpie and traced around some of the edges. I wasn't quite done with it when the boys came home from school, and Royce told me that he liked it right away. Then he ask,"Who's it for?" I said, "I don't know." He said, "Well the dog's name should be Zippy." I replied, "That's a cute name. Thanks Royce."  Gannon took his turn looking at it too, and ran away with to our front entry/ office room. He kept saying, "Dog, dog. Woof, woof, woof." Then I said, "Yes, that is a dog; dog's say woof, woof, but what is the dog's name? You're Gannon. What is the dog's name?" He replied, "Cat." I said, "No, not cat. What is it? He replied, "Dog, woof woof." I said, "Yes, so what is the dog's name?" He replied laughing, "Cat." (Lol, so young and already teases his mommy.) Of course this is coming from a boy who named a blue striped bunny Eyes. I thought it should be Blue Bunny like the ice cream, but he insisted it's name was Eyes.


Royce singing, "His name is Zippy, Zippy the dog."
like the song from the cartoons Kipper the Dog.
 
Gannon pointing at it's ear saying, "ear."


 Anyhow, after the boys were put to bed I finished the wall art with a little white acrylic paint to make clouds.


After adding clouds.

But I liked it better upside down.
Tell me what you think. Do you like Zippy better upside down or right side up?

LinkWithin

Related Posts Plugin for WordPress, Blogger...